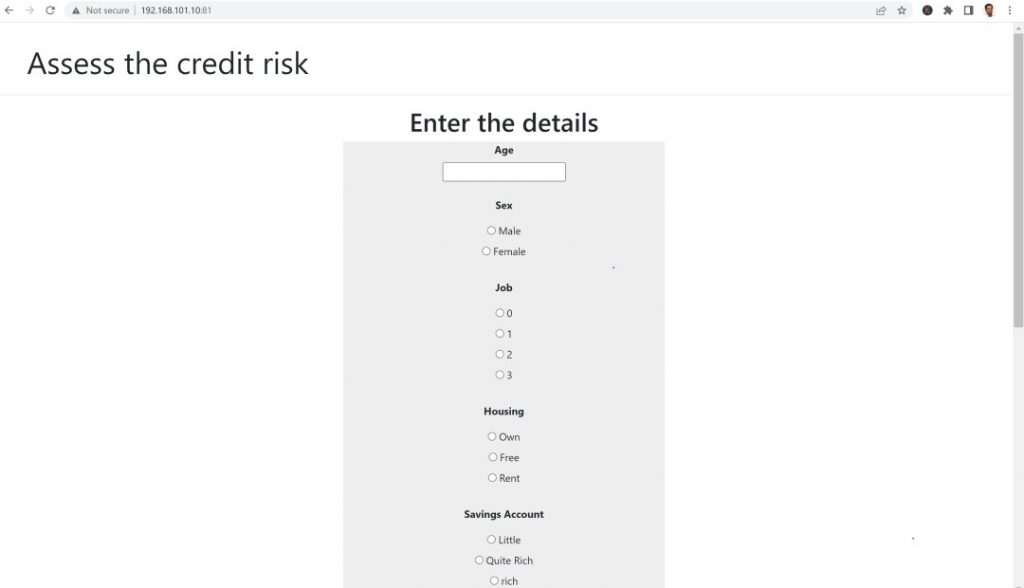
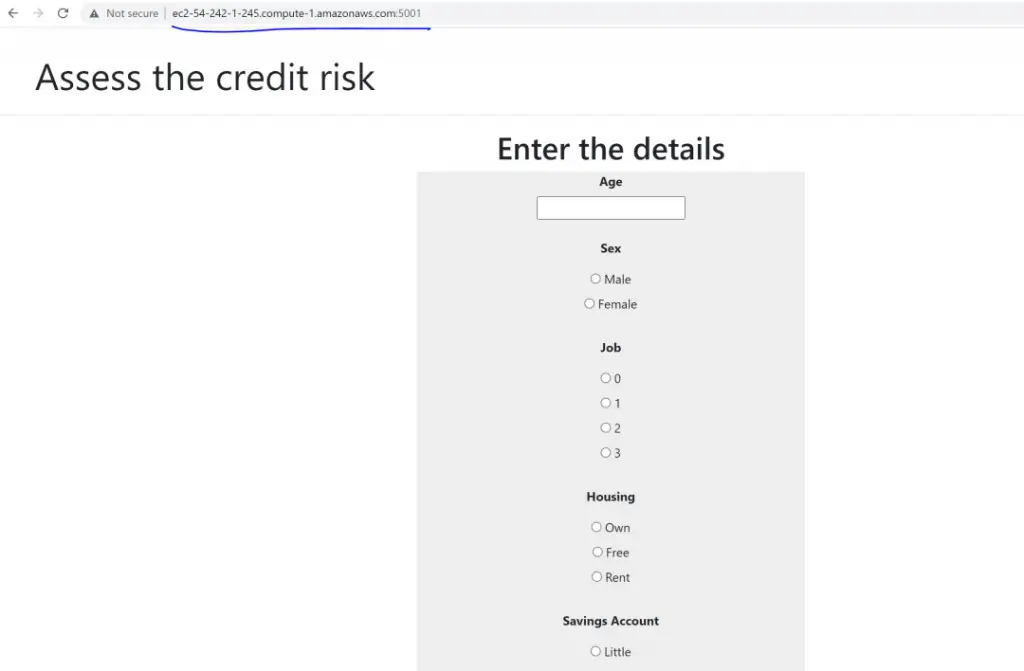
In this guide, you will understand the steps to deploy your ML model app in Amazon EC2 service. Here the ML app is a flask based. However, the same steps and ideas can be followed to host apps built with other similar applications.
Note that we will not be covering how to build an ML model. Instead you will use the ready made code that trains the ML model and store it as a pickle file directly. This guide is meant to serve as a walk through with full explanation of how to host an already running ML model app in AWS EC2 instance from scratch.
Below is the brief of the steps you will need to do.
Steps to Deploy your ML app in AWS EC2
Below are the steps we will follow to host and serve the ML model from AWS EC2.
Step 1. Download the code. Then, build your ML model locally and start it as a flask app. We will use this model and host it in AWS EC2.
Step 2. Launch an EC2 instance in AWS. A free tier instance is sufficient for demo purposes.
Step 3. Connect to AWS EC2 instance using ssh
Step 4. Move your files to AWS Ec2 using Secure Copy (Scp)
Step 5. Install the necessary packages and run app.py to start the app.
You can now access the app from the browser in the designated URL you will get when you created the EC2 instance.
Pre Requisites
- A working ML model built as a REST API, preferably with flask or similar framework. You can download the code for the model app here.
- AWS Account. If you don’t have one, you can create it here. You will need a credit card to create one, however, to deploy your model, we are going to be using a free tier instance, which will not incur cost.
- You will need Python with an IDE installed to build, debug and serve your app locally. Recommend anaconda for this.
Step 1: Run the ML flask app in your local computer
- Download the code directory zip file and extract contents.
- Open terminal or command prompt and change directory to the code folder: `cd downloaded_code_directory`
- Run `python app.py`
If everything goes well, the above step will start a flask app and give a local URL to access the app. Visit the URL to access your app screen.
Step 2: Launch a free tier micro instance on AWS
On creating an AWS account, launch a free tier EC2 instance.
- Login to your AWS account from console.aws.amazon.com.
Then, Search ‘EC2’ in the search box in the top. Or you can find it in the list of services under ‘Compute’
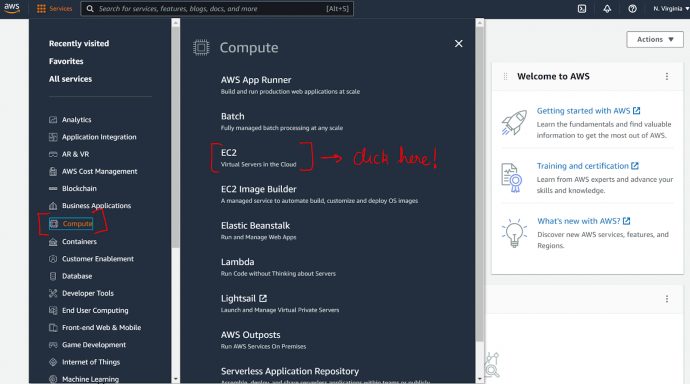
- Launch an EC2 Instance
To launch an EC2 instance, you will have to go through a sequence of steps. An EC2 instance is nothing but a remote computer that will run at an Amazon Data Center that we can lease to host our ML app.
Let’s go over the steps one by one.
(i) Click the launch instance button from the EC2 dashboard.
This will get you started with creating a new EC2 instance.
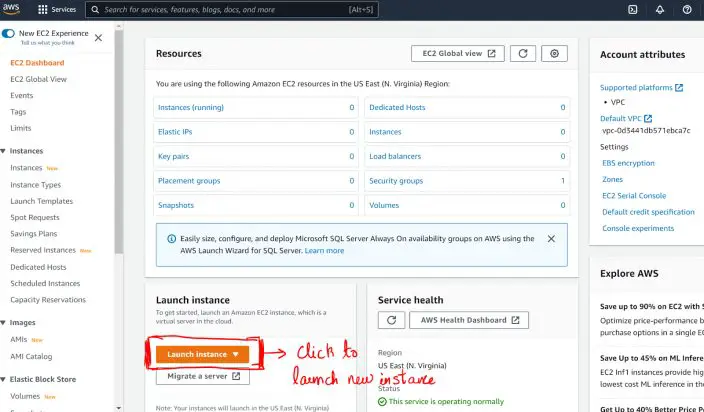
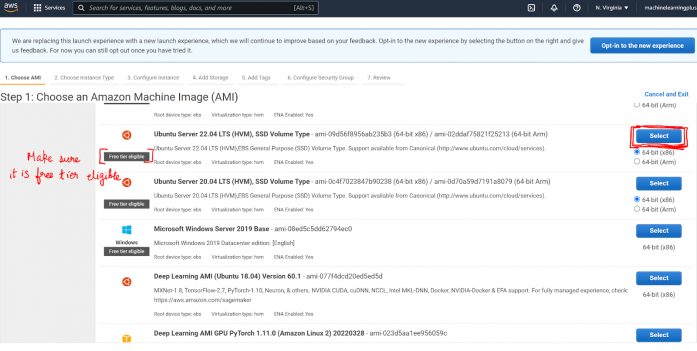
(ii) Choose an AMI Image that is eligible for Free Tier
The following screen will list the available EC2 instances, also called Amazon Machine Image (AMI). Pick one that is ‘Free Tier Eligible’. Other instance types will accrue cost.
(iii) Choose the instance type that belong to the selected AMI
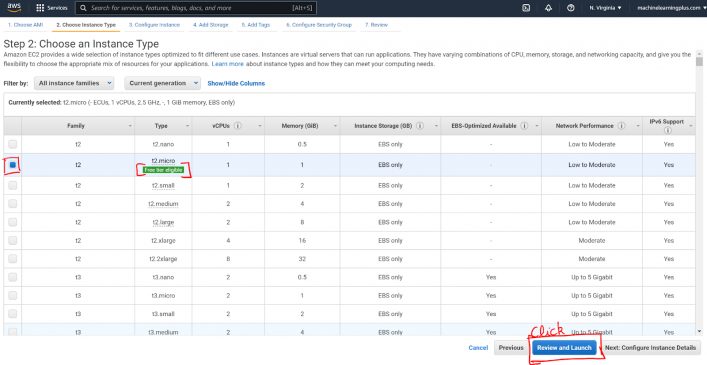
In the following screen, it will ask to select the instance type with number of CPUs, RAM, memory limit etc.
For our app, since we are going with the Free Tier, pick the one with ‘t2.micro’ in green with one CPU, 1GB memory. Then click ‘Review and Launch’ blue button at the bottom.
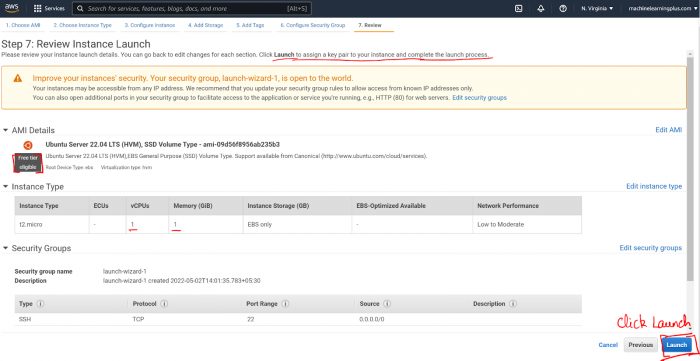
(iv) Review and Launch
(v) Create a Key Pair (don’t ignore)
You will be greeted with a screen that will allow you to create a key pair. This step is important. A key pair is a file that is needed to connect to your AWS instance. You will be allowed to download the key pair only once. So download it now and store it safely. This is an additional layer of security that AWS imposes.
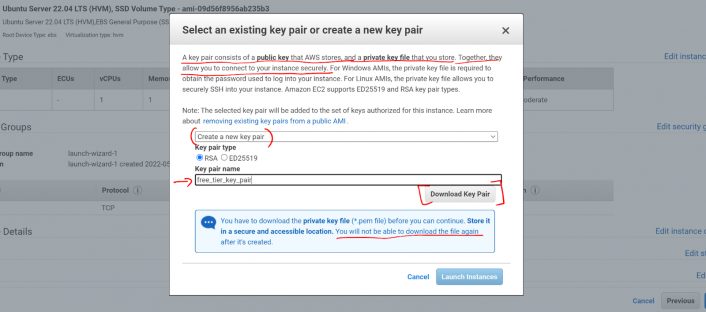
Clicking ‘Download Key Pair’ will download a `.pem` file. In this case it will be called ‘free_tier_key_pair.pem’.
Let’s keep this safe. Once downloaded, click ‘Launch Instances’.
Wait for a few seconds and the instance will be launched.
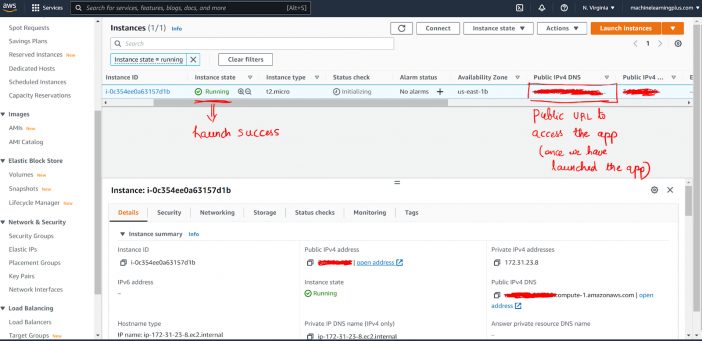
You then will be able to see a live instance by clicking the instances button on the EC2 dashboard. We will be launching our flask app in this instance.
Next, Let’s create a security group.
(vi) Create a Security Group
A security group lets us control who can send requests to the server (instance).
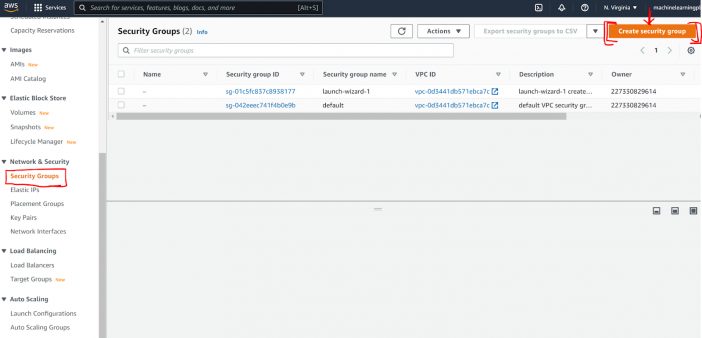
Under ‘Network and Security’ tab → Select ‘Security Groups’. Then Click ‘Create Security Group’ to create one.
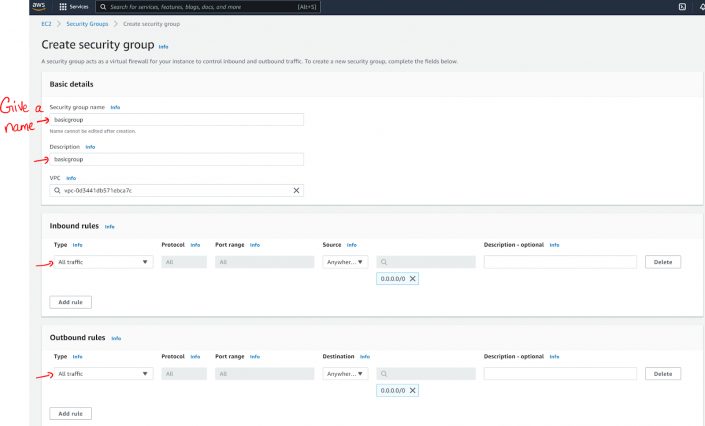
Give a name to the security group and keep it default.
Now, we need to change the security group for the instance to the new group we just created.
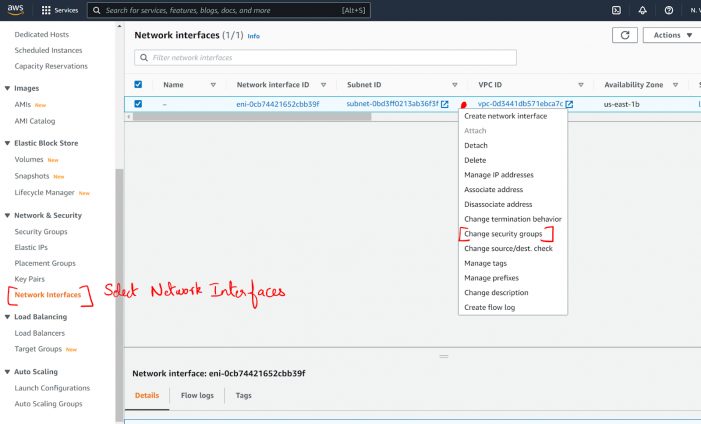
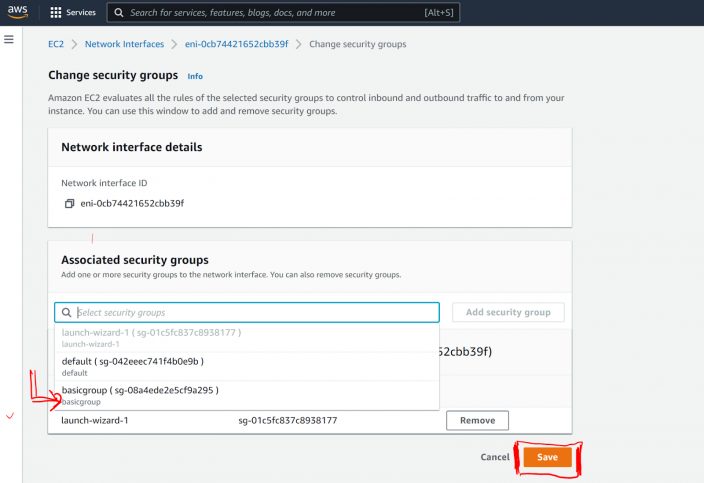
To do that, go to “Network and Security” → “Network Interfaces” → Right click on the instance and select “Change security groups”.
Then select the group we just created (basicgroup) and hit Save.
We are now all set to connect to the EC2 instance.
Step 3. Connect to AWS EC2 instance using ssh
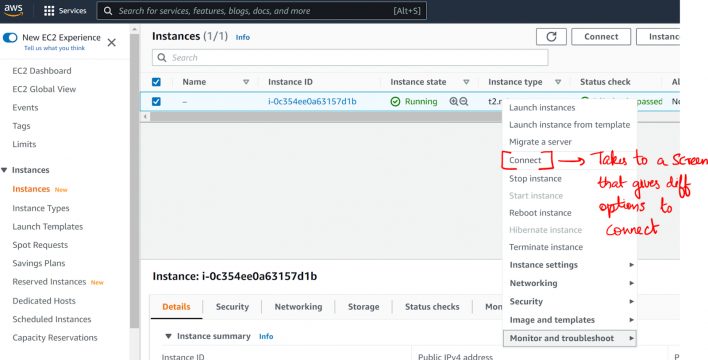
The following screen shows the instructions on how to connect to the ubuntu AWS EC2 instance from your local computer.
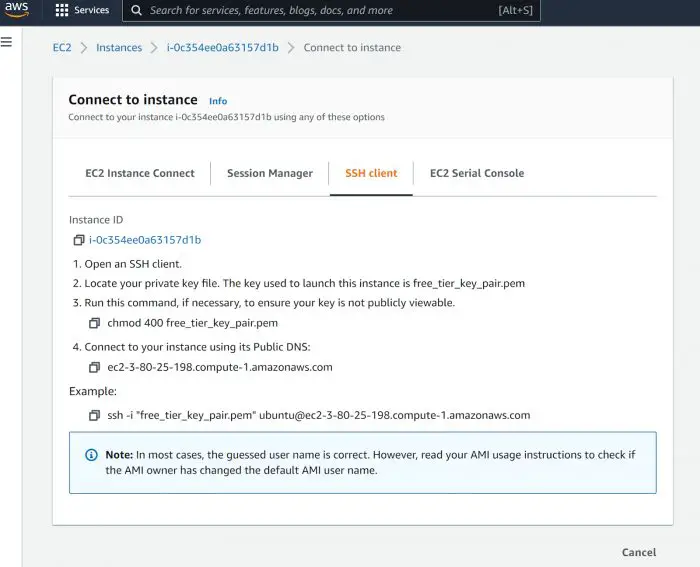
Let’s start connecting.
I am on a Windows computer. The procedure is very similar on a linux/mac system as well.
To make the connection with the remote AWS EC2 instance, `cd` to the folder that contains the Key Pair file, which in this case is `free_tier_key_pair.pem`.
Then, as shown in the screen, type the following command from your command prompt if you are on windows, or the Terminal if you are on a Mac or Linux computer.
ssh -i "free_tier_key_pair.pem" [email protected]In the above command, you will need to replace the name of the pem file and the ec2 instance url.
The default username however in most cases is `ubuntu` so you can keep the `ubuntu@ec2..` part as it is.
This will make an `ssh` connection to the AWS EC2 instance. `ssh` stands for secure shell.
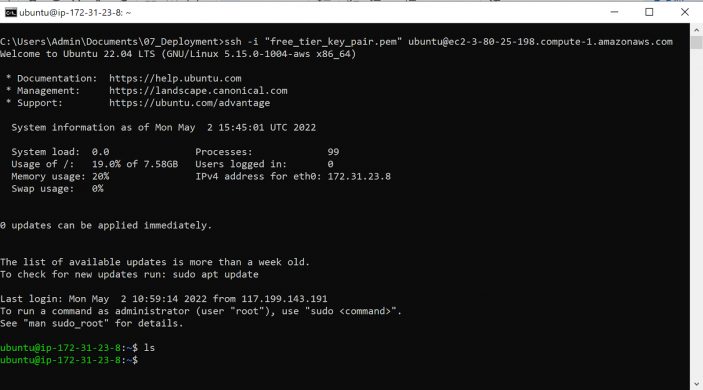
We are now connected to our AWS Ubuntu terminal. Now you can start typing the ubuntu shell commands from right here in your Windows machine.
Next, we need to copy the project files from local computer to the remote Ubuntu machine that we’ve leased.
Step 4. Move your files to AWS Ec2 using Secure Copy (scp)
Let’s move the project folder to AWS.
To do this, you need to be in the Windows command prompt. So open a new command prompt and cd to the folder that contains the project directory and issue the following command to secure copy the files to EC2 instance.
scp -r -i "free_tier_key_pair.pem" ./flask_classification [email protected]:~/
Again you will need to update the path to pem file and the ec2 url.

Again ssh to the remote instance, and check if you can find the files there.
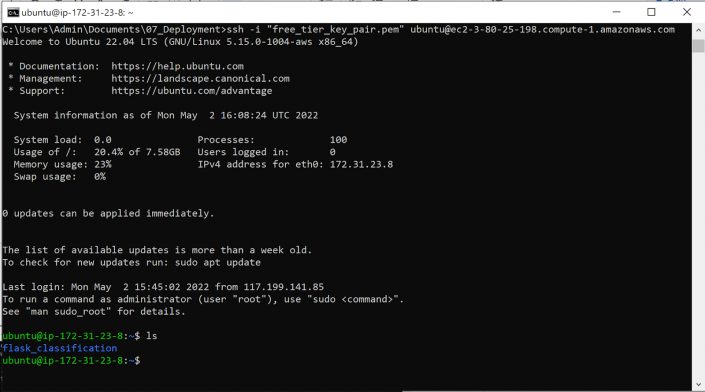
Great!
All the files have been copied. Let’s install the packages and start the app.
Step 5. Install the necessary packages and run app.py to start the app
sudo apt-get update
sudo apt-get -y install python3-pip
pip3 install <each of the following packages>
Packages needed:
catboost
flask
scikit-learn
Once the packages are installed, cd to the flask_classification directory and run python app.py. This should start the app and make it run from Amazon EC2 instance.
Now, you can in fact everyone can access it from the EC2 instance URL.
Useful Tips and Tricks
- If you have trouble connecting putty to ec2 instance read answer by Darius
- To keep the server running even after disconnecting ssh
Answer 1: nohup python3 app.py &
Answer 2: Use screen
- Install OpenCV Python on ubuntu
sudo apt-get install python3-opencv


