Naive Bayes is a probabilistic machine learning algorithm based on the Bayes Theorem, used in a wide variety of classification tasks.
In this post, you will gain a clear and complete understanding of the Naive Bayes algorithm and all necessary concepts so that there is no room for doubts or gap in understanding.
Contents
1. Introduction
2. What is Conditional Probability?
3. The Bayes Rule
4. The Naive Bayes
5. Naive Bayes Example by Hand
6. What is Laplace Correction?
7. What is Gaussian Naive Bayes?
8. Building a Naive Bayes Classifier in R
9. Building Naive Bayes Classifier in Python
10. Practice Exercise: Predict Human Activity Recognition (HAR)
11. Tips to improve the model
1. Introduction
Naive Bayes is a probabilistic machine learning algorithm that can be used in a wide variety of classification tasks.
Typical applications include filtering spam, classifying documents, sentiment prediction etc. It is based on the works of Rev. Thomas Bayes (1702) and hence the name.
But why is it called ‘Naive’?
The name naive is used because it assumes the features that go into the model is independent of each other. That is changing the value of one feature, does not directly influence or change the value of any of the other features used in the algorithm.
Alright. By the sounds of it, Naive Bayes does seem to be a simple yet powerful algorithm. But why is it so popular?
That’s because there is a significant advantage with NB. Since it is a probabilistic model, the algorithm can be coded up easily and the predictions made real quick. Real-time quick.
Because of this, it is easily scalable and is traditionally the algorithm of choice for real-world applications (apps) that are required to respond to user’s requests instantaneously.
But before you go into Naive Bayes, you need to understand what ‘Conditional Probability’ is and what is the ‘Bayes Rule’.
And by the end of this tutorial, you will know:
- How exactly Naive Bayes Classifier works step-by-step
- What is Gaussian Naive Bayes, when is it used and how it works?
- How to code it up in R and Python
- How to improve your Naive Bayes models?
Cool? Let’s begin.
Also: You might enjoy our Industrial project course based on a real world problem. It comes with a Full Hands-On Walk-through of mutliple ML solution strategies: Microsoft Malware Detection.
2. What is Conditional Probability?
Lets start from the basics by understanding conditional probability.
Coin Toss and Fair Dice Example When you flip a fair coin, there is an equal chance of getting either heads or tails. So you can say the probability of getting heads is 50%. Similarly what would be the probability of getting a 1 when you roll a dice with 6 faces? Assuming the dice is fair, the probability of 1/6 = 0.166.
Alright, one final example with playing cards.
Playing Cards Example If you pick a card from the deck, can you guess the probability of getting a queen given the card is a spade? Well, I have already set a condition that the card is a spade.
So, the denominator (eligible population) is 13 and not 52. And since there is only one queen in spades, the probability it is a queen given the card is a spade is 1/13 = 0.077
This is a classic example of conditional probability.
So, when you say the conditional probability of A given B, it denotes the probability of A occurring given that B has already occurred.
Mathematically, Conditional probability of A given B can be computed as: P(A|B) = P(A AND B) / P(B) School Example
Let’s see a slightly complicated example.
Consider a school with a total population of 100 persons. These 100 persons can be seen either as ‘Students’ and ‘Teachers’ or as a population of ‘Males’ and ‘Females’.
With below tabulation of the 100 people, what is the conditional probability that a certain member of the school is a ‘Teacher’ given that he is a ‘Man’?
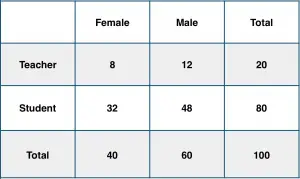 To calculate this, you may intuitively filter the sub-population of 60 males and focus on the 12 (male) teachers. So the required conditional probability P(Teacher | Male) = 12 / 60 = 0.2.
  This can be represented as the intersection of Teacher (A) and Male (B) divided by Male (B). Likewise, the conditional probability of B given A can be computed. The Bayes Rule that we use for Naive Bayes, can be derived from these two notations.
3. The Bayes Rule
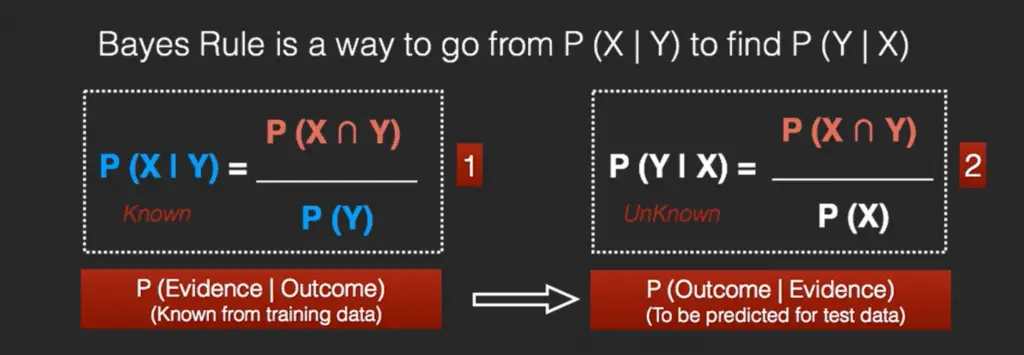
The Bayes Rule is a way of going from P(X|Y), known from the training dataset, to find P(Y|X).
To do this, we replace A and B in the above formula, with the feature X and response Y.
For observations in test or scoring data, the X would be known while Y is unknown. And for each row of the test dataset, you want to compute the probability of Y given the X has already happened..
What happens if Y has more than 2 categories? we compute the probability of each class of Y and let the highest win.
4. The Naive Bayes
The Bayes Rule provides the formula for the probability of Y given X.
But, in real-world problems, you typically have multiple X variables.
When the features are independent, we can extend the Bayes Rule to what is called Naive Bayes.
It is called ‘Naive’ because of the naive assumption that the X’s are independent of each other.
Regardless of its name, it’s a powerful formula. 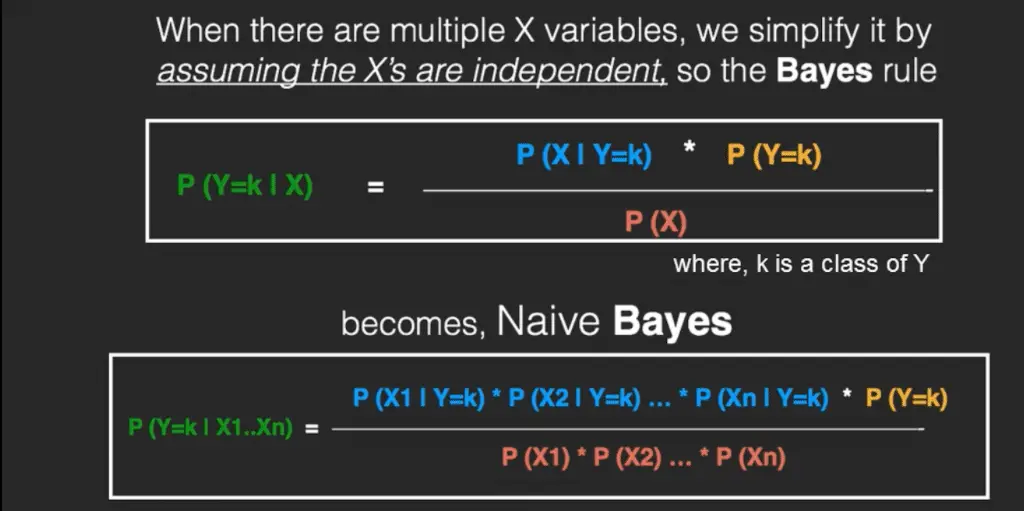
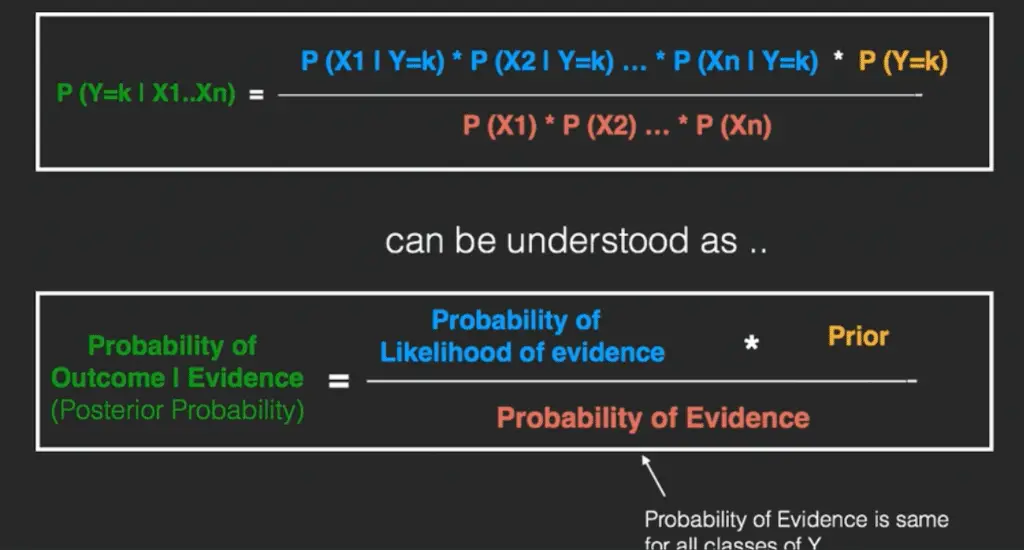 In technical jargon, the left-hand-side (LHS) of the equation is understood as the posterior probability or simply the posterior .
The RHS has 2 terms in the numerator. The first term is called the ‘Likelihood of Evidence’. It is nothing but the conditional probability of each X’s given Y is of particular class ‘c’. Since all the X’s are assumed to be independent of each other, you can just multiply the ‘likelihoods’ of all the X’s and called it the ‘Probability of likelihood of evidence’.
This is known from the training dataset by filtering records where Y=c. The second term is called the prior which is the overall probability of Y=c, where c is a class of Y. In simpler terms, Prior = count(Y=c) / n_Records.
An example is better than an hour of theory. So let’s see one.
5. Naive Bayes Example by Hand
Say you have 1000 fruits which could be either ‘banana’, ‘orange’ or ‘other’. These are the 3 possible classes of the Y variable. We have data for the following X variables, all of which are binary (1 or 0).
- Long
- Sweet
- Yellow
The first few rows of the training dataset look like this:
| Fruit | Long (x1) | Sweet (x2) | Yellow (x3) |
|---|---|---|---|
| Orange | 0 | 1 | 0 |
| Banana | 1 | 0 | 1 |
| Banana | 1 | 1 | 1 |
| Other | 1 | 1 | 0 |
| .. | .. | .. | .. |
For the sake of computing the probabilities, let’s aggregate the training data to form a counts table like this. 
So the objective of the classifier is to predict if a given fruit is a ‘Banana’ or ‘Orange’ or ‘Other’ when only the 3 features (long, sweet and yellow) are known.
Let’s say you are given a fruit that is: Long, Sweet and Yellow, can you predict what fruit it is?
This is the same of predicting the Y when only the X variables in testing data are known.
Let’s solve it by hand using Naive Bayes. The idea is to compute the 3 probabilities, that is the probability of the fruit being a banana, orange or other. Whichever fruit type gets the highest probability wins.
All the information to calculate these probabilities is present in the above tabulation.
Step 1: Compute the ‘Prior’ probabilities for each of the class of fruits. That is, the proportion of each fruit class out of all the fruits from the population.
You can provide the ‘Priors’ from prior information about the population. Otherwise, it can be computed from the training data. For this case, let’s compute from the training data. Out of 1000 records in training data, you have 500 Bananas, 300 Oranges and 200 Others.
So the respective priors are 0.5, 0.3 and 0.2. P(Y=Banana) = 500 / 1000 = 0.50 P(Y=Orange) = 300 / 1000 = 0.30 P(Y=Other) = 200 / 1000 = 0.20
Step 2: Compute the probability of evidence that goes in the denominator. This is nothing but the product of P of Xs for all X. This is an optional step because the denominator is the same for all the classes and so will not affect the probabilities. P(x1=Long) = 500 / 1000 = 0.50 P(x2=Sweet) = 650 / 1000 = 0.65 P(x3=Yellow) = 800 / 1000 = 0.80
Step 3: Compute the probability of likelihood of evidences that goes in the numerator. It is the product of conditional probabilities of the 3 features. If you refer back to the formula, it says P(X1 |Y=k).
Here X1 is ‘Long’ and k is ‘Banana’.
That means the probability the fruit is ‘Long’ given that it is a Banana. In the above table, you have 500 Bananas. Out of that 400 is long.
So, P(Long | Banana) = 400/500 = 0.8. Here, I have done it for Banana alone.
Probability of Likelihood for Banana P(x1=Long | Y=Banana) = 400 / 500 = 0.80 P(x2=Sweet | Y=Banana) = 350 / 500 = 0.70 P(x3=Yellow | Y=Banana) = 450 / 500 = 0.90.
So, the overall probability of Likelihood of evidence for Banana = 0.8 * 0.7 * 0.9 = 0.504
Step 4: Substitute all the 3 equations into the Naive Bayes formula, to get the probability that it is a banana. 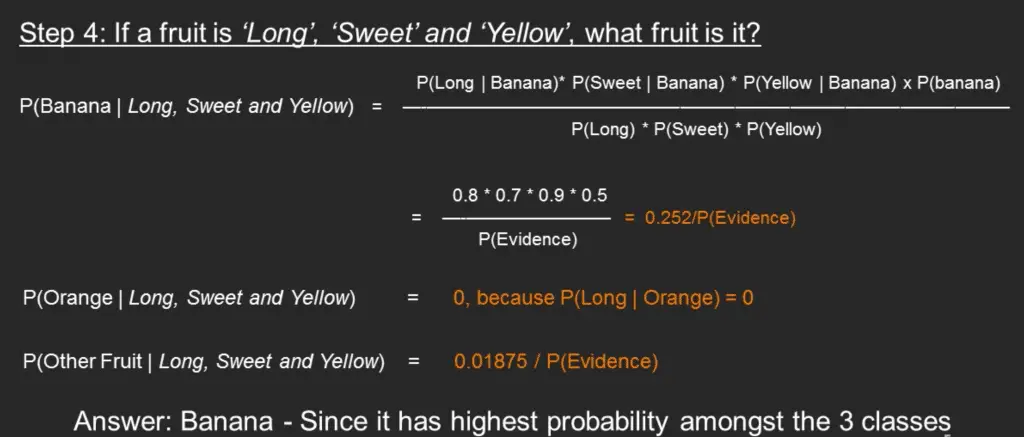
Similarly, you can compute the probabilities for ‘Orange’ and ‘Other fruit’. The denominator is the same for all 3 cases, so it’s optional to compute. Clearly, Banana gets the highest probability, so that will be our predicted class.
6. What is Laplace Correction?
The value of P(Orange | Long, Sweet and Yellow) was zero in the above example, because, P(Long | Orange) was zero.
That is, there were no ‘Long’ oranges in the training data.
It makes sense, but when you have a model with many features, the entire probability will become zero because one of the feature’s value was zero. To avoid this, we increase the count of the variable with zero to a small value (usually 1) in the numerator, so that the overall probability doesn’t become zero. This approach is called ‘Laplace Correction’.
Most Naive Bayes model implementations accept this or an equivalent form of correction as a parameter.
7. What is Gaussian Naive Bayes?
So far we’ve seen the computations when the X’s are categorical.
But how to compute the probabilities when X is a continuous variable?
If we assume that the X follows a particular distribution, then you can plug in the probability density function of that distribution to compute the probability of likelihoods.
If you assume the X’s follow a Normal (aka Gaussian) Distribution, which is fairly common, we substitute the corresponding probability density of a Normal distribution and call it the Gaussian Naive Bayes.
You need just the mean and variance of the X to compute this formula.  where mu and sigma are the mean and variance of the continuous X computed for a given class ‘c’ (of Y).
To make the features more Gaussian like, you might consider transforming the variable using something like the Box-Cox to achieve this.
That’s it. Now, let’s build a Naive Bayes classifier.
8. Building a Naive Bayes Classifier in R
Understanding Naive Bayes was the (slightly) tricky part. Implementing it is fairly straightforward.
In R, Naive Bayes classifier is implemented in packages such as e1071, klaR and bnlearn.
In Python, it is implemented in scikit learn, h2o etc.
For sake of demonstration, let’s use the standard iris dataset to predict the Species of flower using 4 different features: Sepal.Length, Sepal.Width, Petal.Length, Petal.Width
# Import Data
training <- read.csv('https://raw.githubusercontent.com/selva86/datasets/master/iris_train.csv')
test <- read.csv('https://raw.githubusercontent.com/selva86/datasets/master/iris_test.csv')
The training data is now contained in training and test data in test dataframe. Lets load the klaR package and build the naive bayes model.
# Using klaR for Naive Bayes
library(klaR)
nb_mod <- NaiveBayes(Species ~ ., data=training)
pred <- predict(nb_mod, test)
Lets see the confusion matrix.
# Confusion Matrix
tab <- table(pred$class, test$Species)
caret::confusionMatrix(tab)
#> Confusion Matrix and Statistics

#>              setosa versicolor virginica
#>   setosa         15          0         0
#>   versicolor      0         11         0
#>   virginica       0          4        15

#> Overall Statistics

#>                Accuracy : 0.9111
#>                  95% CI : (0.7878, 0.9752)
#>     No Information Rate : 0.3333
#>     P-Value [Acc > NIR] : 8.467e-16

#>                   Kappa : 0.8667
#>  Mcnemar's Test P-Value : NA

#> Statistics by Class:

#>                      Class: setosa Class: versicolor Class: virginica
#> Sensitivity                 1.0000            0.7333           1.0000
#> Specificity                 1.0000            1.0000           0.8667
#> Pos Pred Value              1.0000            1.0000           0.7895
#> Neg Pred Value              1.0000            0.8824           1.0000
#> Prevalence                  0.3333            0.3333           0.3333
#> Detection Rate              0.3333            0.2444           0.3333
#> Detection Prevalence        0.3333            0.2444           0.4222
#> Balanced Accuracy           1.0000            0.8667           0.9333
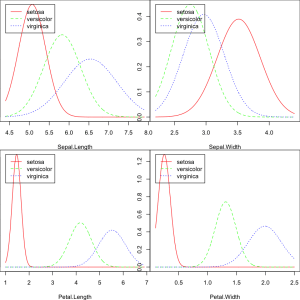
# Plot density of each feature using nb_mod
opar = par(mfrow=c(2, 2), mar=c(4,0,0,0))
plot(nb_mod, main="")
par(opar)
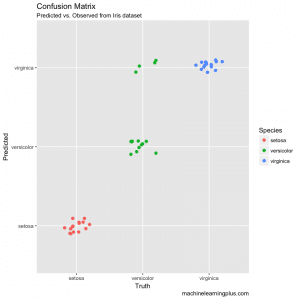
# Plot the Confusion Matrix
library(ggplot2)
test$pred <- pred$class
ggplot(test, aes(Species, pred, color = Species)) +
  geom_jitter(width = 0.2, height = 0.1, size=2) +
  labs(title="Confusion Matrix",
       subtitle="Predicted vs. Observed from Iris dataset",
       y="Predicted",
       x="Truth",
       caption="machinelearningplus.com")
9. Building Naive Bayes Classifier in Python
# Import packages
from sklearn.naive_bayes import GaussianNB
from sklearn.model_selection import train_test_split
from sklearn.metrics import confusion_matrix
import numpy as np
import pandas as pd
import matplotlib.pyplot as plt
import seaborn as sns; sns.set()

# Import data
training = pd.read_csv('https://raw.githubusercontent.com/selva86/datasets/master/iris_train.csv')
test = pd.read_csv('https://raw.githubusercontent.com/selva86/datasets/master/iris_test.csv')


# Create the X, Y, Training and Test
xtrain = training.drop('Species', axis=1)
ytrain = training.loc[:, 'Species']
xtest = test.drop('Species', axis=1)
ytest = test.loc[:, 'Species']


# Init the Gaussian Classifier
model = GaussianNB()

# Train the model
model.fit(xtrain, ytrain)

# Predict Output
pred = model.predict(xtest)

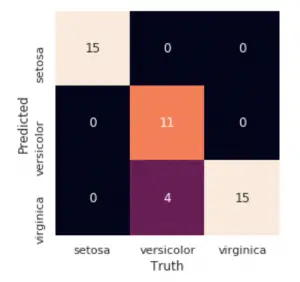
# Plot Confusion Matrix
mat = confusion_matrix(pred, ytest)
names = np.unique(pred)
sns.heatmap(mat, square=True, annot=True, fmt='d', cbar=False,
            xticklabels=names, yticklabels=names)
plt.xlabel('Truth')
plt.ylabel('Predicted')
10. Practice Exercise: Predict Human Activity Recognition (HAR)
The objective of this practice exercise is to predict current human activity based on phisiological activity measurements from 53 different features based in the HAR dataset.
The training and test datasets are provided.
Build a Naive Bayes model, predict on the test dataset and compute the confusion matrix. Show R Solution
# R Solution
library(caret)
training <- read.csv("har_train.csv", na.strings = c("NA", ""))
test <- read.csv("har_validate.csv", na.strings = c("NA", ""))

# Train Naive Bayes using klaR
library(klaR)

# Train
nb_mod <- NaiveBayes(classe ~ ., data=training, fL=1, usekernel = T) . # with kernel and laplace correction = 1

# Predict
pred <- suppressWarnings(predict(nb_mod, test))

# Confusion Matrix
tab <- table(pred$class, test$classe)
caret::confusionMatrix(tab)  # Computes the accuracy metrics for all individual classes.

# Plot the Confusion Matrix
library(ggplot2)
test$pred <- pred$class
ggplot(test, aes(classe, pred, color = classe)) +
  geom_jitter(width = 0.3, height = 0.3, size=1) +
  labs(title="Confusion Matrix",
       subtitle="Predicted vs. Observed from HAR dataset",
       y="Predicted",
       x="Truth",
       caption="machinelearningplus.com")
Confusion Matrix and Statistics


       A    B    C    D    E
  A 1222   80   66   67   27
  B   80  799   70    5  106
  C  167  170  828  175   54
  D  197   82   60  680   52
  E    8    8    2   37  843

Overall Statistics

               Accuracy : 0.7429
                 95% CI : (0.7315, 0.754)
    No Information Rate : 0.2845
    P-Value [Acc > NIR] : < 2.2e-16

                  Kappa : 0.6767
 Mcnemar's Test P-Value : < 2.2e-16

Statistics by Class:

                     Class: A Class: B Class: C Class: D Class: E
Sensitivity            0.7300   0.7015   0.8070   0.7054   0.7791
Specificity            0.9430   0.9450   0.8835   0.9205   0.9885
Pos Pred Value         0.8358   0.7538   0.5940   0.6349   0.9388
Neg Pred Value         0.8978   0.9295   0.9559   0.9410   0.9521
Prevalence             0.2845   0.1935   0.1743   0.1638   0.1839
Detection Rate         0.2076   0.1358   0.1407   0.1155   0.1432
Detection Prevalence   0.2484   0.1801   0.2369   0.1820   0.1526
Balanced Accuracy      0.8365   0.8232   0.8453   0.8130   0.8838

# Python Solution
# Import packages
from sklearn.naive_bayes import GaussianNB
from sklearn.model_selection import train_test_split
from sklearn.metrics import confusion_matrix
import numpy as np
import pandas as pd
import matplotlib.pyplot as plt
import seaborn as sns; sns.set()

# Import data
training = pd.read_csv("har_train.csv")
test =  pd.read_csv("har_validate.csv")

# Create the X and Y
xtrain = training.drop('classe', axis=1)
ytrain = training.loc[:, 'classe']

xtest = test.drop('classe', axis=1)
ytest = test.loc[:, 'classe']

# Init the Gaussian Classifier
model = GaussianNB()

# Train the model
model.fit(xtrain, ytrain)

# Predict Output
pred = model.predict(xtest)
print(pred[:5])

# Plot Confusion Matrix
mat = confusion_matrix(pred, ytest)
names = np.unique(pred)
sns.heatmap(mat, square=True, annot=True, fmt='d', cbar=False,
            xticklabels=names, yticklabels=names)
plt.xlabel('Truth')
plt.ylabel('Predicted')
11. Tips to improve the model
- Try transforming the variables using transformations like BoxCox or YeoJohnson to make the features near Normal.
- Try applying Laplace correction to handle records with zeros values in X variables.
- Check for correlated features and try removing the highly correlated ones. Naive Bayes is based on the assumption that the features are independent.
- Feature engineering. Combining features (a product) to form new ones that makes intuitive sense might help.
- Try providing more realistic prior probabilities to the algorithm based on knowledge from business, instead of letting the algo calculate the priors based on the training sample.
For this case, ensemble methods like bagging, boosting will help a lot by reducing the variance.
Recommended: Industrial project course (Full Hands-On Walk-through): Microsoft Malware Detection.


